-
생각 없이 잠이나 계속 자고 싶은데
여섯시만 되면 눈이 떠진당😿
습관이 들긴 했나부다 에효 ~ ~

요번엔 이 부분!
첫 섹션이랑 같은 스크롤 이벤트지만 좀 더 나아진 코드로 ㅎㅎ
확실히 애플사이트가 부드럽다
내가 만든 건 삐걱이는데 ㅋㅋㅋ ㅜ
  <section>
    <article>
        <div class="video">
          <video src="../img/noise_bg.mp4" autoplay muted loop></video>
        </div>
        <figure>
          <img src="../img/xray01.jpeg" alt="xray01">
        </figure>
        <figure>
          <img src="../img/xray02.jpeg" alt="xray02">
        </figure>
        <figure>
          <img src="../img/xray03.jpeg" alt="xray03">
        </figure>
    </article>
    <div class="typo">
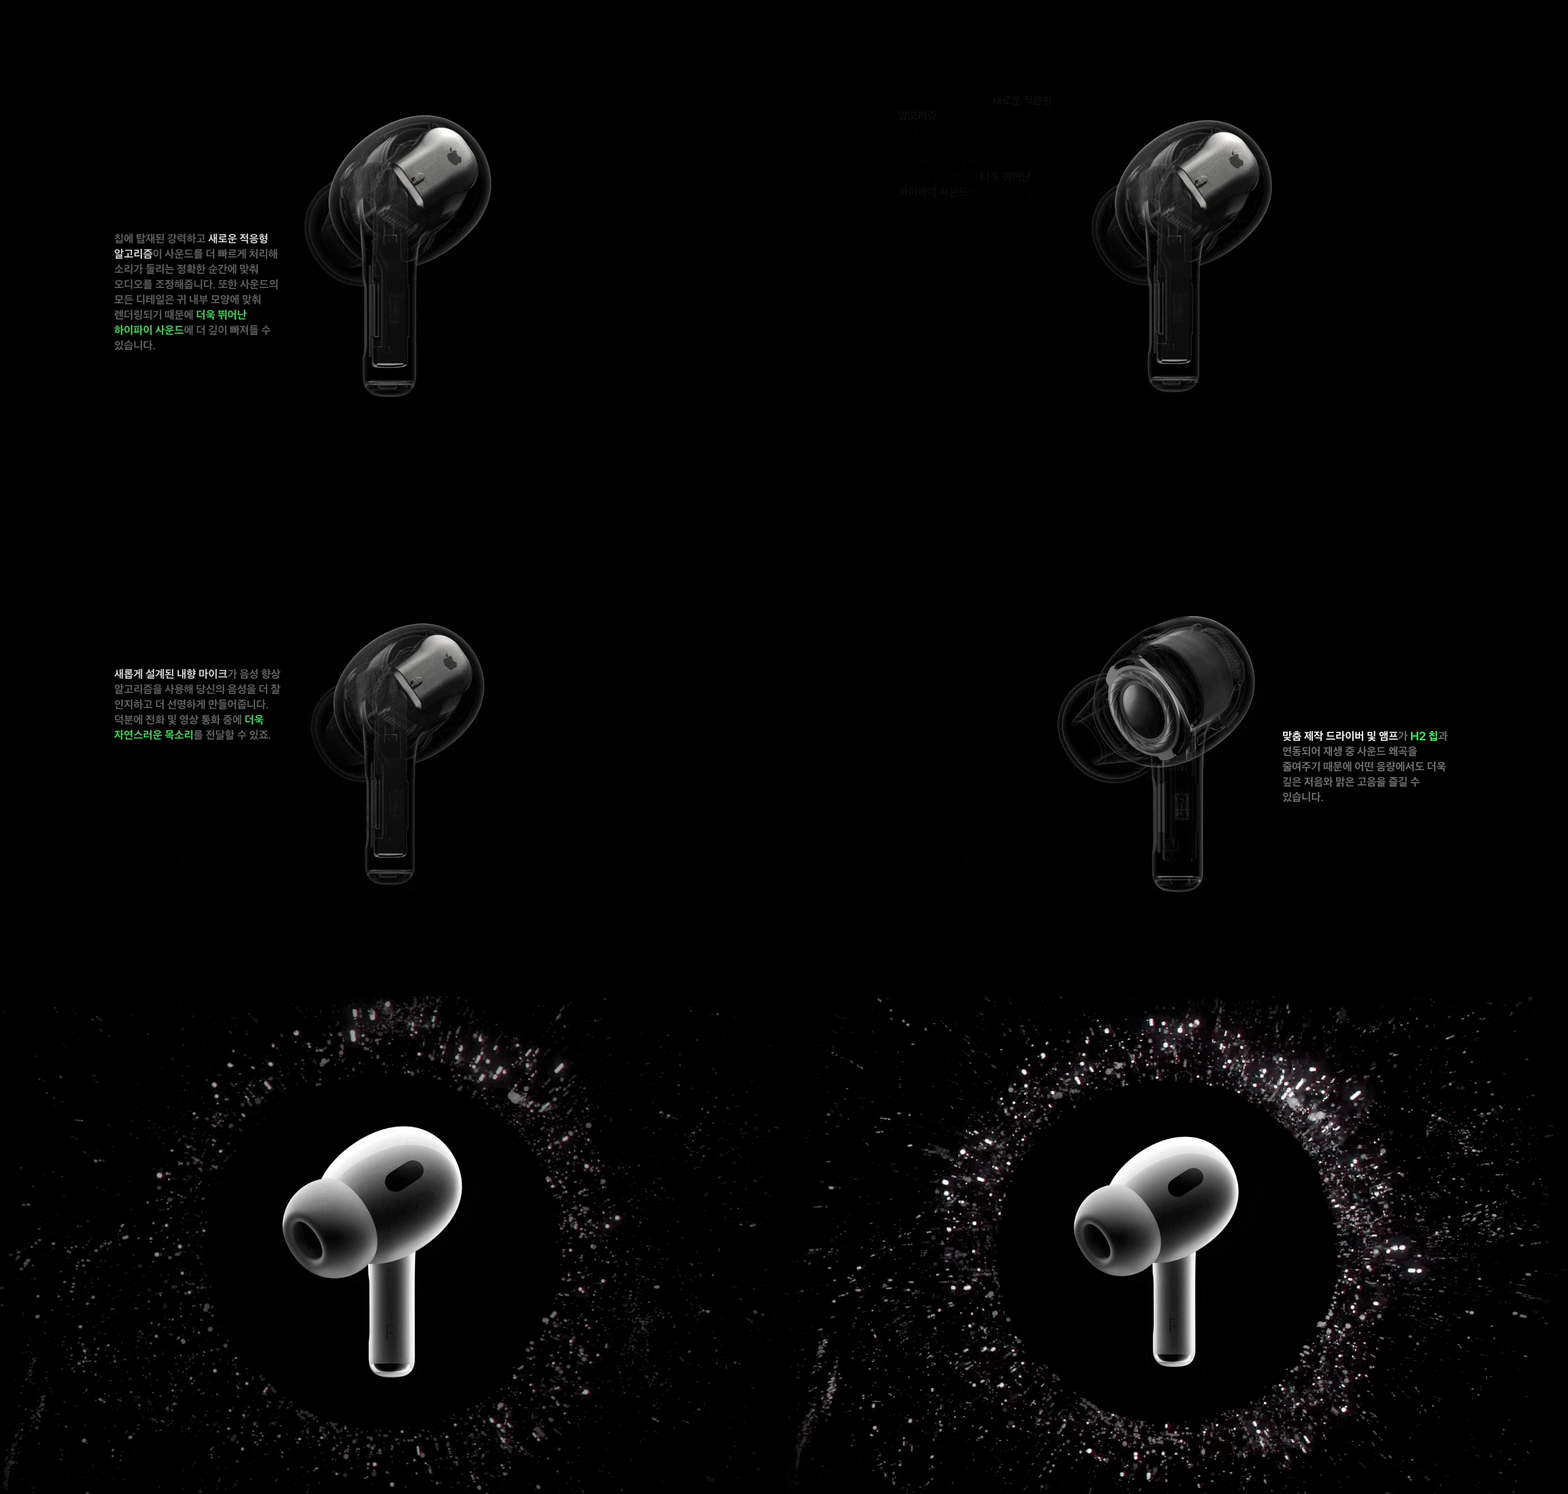
      <p>칩에 탑재된 강력하고 <strong class="white">새로운 적응형 알고리즘</strong>이 사운드를 더 빠르게 처리해 소리가 들리는 정확한 순간에 맞춰 오디오를 조정해줍니다. 또한 사운드의 모든 디테일은 귀 내부 모양에 맞춰 렌더링되기 때문에 <strong class="green">더욱 뛰어난 하이파이 사운드</strong>에 더 깊이 빠져들 수 있습니다.</p>
      <p><strong class="white">새롭게 설계된 내향 마이크</strong>가 음성 향상 알고리즘을 사용해 당신의 음성을 더 잘 인지하고 더 선명하게 만들어줍니다. 덕분에 전화 및 영상 통화 중에 <strong class="green">더욱 자연스러운 목소리</strong>를 전달할 수 있죠.</p>
      <p><strong class="white">맞춤 제작 드라이버 및 앰프</strong>가 <strong class="green">H2 칩</strong>과 연동되어 재생 중 사운드 왜곡을 줄여주기 때문에 어떤 음량에서도 더욱 깊은 저음와 맑은 고음을 즐길 수 있습니다.</p>
    </div>
  </section>
HTML 구조는 이렇게!
이미지는 sticky로 고정 되어있고
텍스트는 스크롤에 따라 흘러가니까
article과 div.typo 두 부분으로 나누어줘따
    * {
      padding: 0;
      margin: 0;
      box-sizing: border-box;
    }
    body {
      background-color: #000;
    }
    .white {
      color: #f5f5f7;
    }
    .green {
      color: #00ff41;
    }
    section {
      height: 300vh;
    }

    article {
      position: sticky;
      top: 0;
      height: 100vh;
      overflow: hidden;
    }

    figure {
      position: absolute;
      top: 50%;
      left: 50%;
      width: 370px;
      transform: translate(-50%, -50%);
      opacity: 0;
    }
    figure:first-child {
      opacity: 1;
    }

    div.video {
      position: absolute;
      top: 50%;
      left: 50%;
      transform: translate(-50%, -50%) scale(1.2);
      width: 1440px;
      opacity: 0;
      transition: opacity 500ms, transform 300ms ease-out;
    }
    div.video.show {
      opacity: 1;
      transform: translate(-50%, -50%) scale(1);
    }
    video{
      width:100%
    }

    img {
      position: relative;
      left: -34px;
      display: block;
      max-width: 100%;
    }
    div.typo {
      position: absolute;
      top: 100%;
      left: 50%;
      transform: translate(-50%, -50%);
      max-width: 980px;
      width: 100%;
      margin: 0 auto;
    }

    p {
      position: relative;
      z-index: 1;
      width: 280px;
      margin-bottom: 250px;
      font-size: 21px;
      color: #6e6e73;
      opacity: 0;
    }

    p:nth-child(3){
      margin-left: auto;
    }
CSS는 이렇게
여러 상황 생각 안 하고
딱! 눈에 보이는 대로! 만들어서 픽셀로 때려박았다 헷
const info = { objs: { section_xray: document.querySelector('section'), xray_imgs: document.querySelectorAll('figure'), xray_texts: document.querySelectorAll('p'), xray_video: document.querySelector('.video'), }, values: { xray_img01_scale: [1, 0.9, {start: 0, end: 0.28}], xray_img01_opaicty: [1, 0, {start: 0.24, end: 0.28}], xray_text01_opacity_in: [0, 1, {start: 0, end: 0.06}], xray_text01_opacity_out: [1, 0, {start: 0.097, end: 0.13}], xray_img02_opaicty: [0, 1, {start: 0.28, end: 0.32}], xray_img02_scale: [1, 0.9, {start: 0.28, end: 0.41}], xray_img02_opaicty_out: [1, 0, {start: 0.36, end: 0.41}], xray_text02_opacity_in: [0, 1, {start: 0.13, end: 0.2}], xray_text02_opacity_out: [1, 0, {start: 0.24, end: 0.28}], xray_img03_opaicty: [0, 1, {start: 0.36, end: 0.41}], xray_img03_scale: [1, 0.9, {start: 0.28, end: 0.41}], xray_text03_opacity_in: [0, 1, {start: 0.28, end: 0.32}], xray_text03_opacity_out: [1, 0, {start: 0.37, end: 0.42}], } };정보모음집(?)
    const xray = () => {

      const method = {
      	imgScale: () => {},  // style 주는 함수
        onScroll: () => {}  // 스크롤 수치 구하는 함수
      };

      const addEvent = () => {  // addEventListener 모아두는 곳
        addEventListener('scroll', method.onScroll)
      };

      const init = () => {  // 초기화 함수 (근데 지금 여기서는 필요 없기는 하당)
        addEvent()
      };

      init();
    };

    addEventListener('load', xray)  // HTML이 로드되면 함수 실행
전체적인 흐름!
저 이미지 받아보니까 이름이 x-ray길래 함수명으로 당첨 키키
아 근데 벌써 부터 이거 어떻게 정리해야 할지 감이 안 잡힌다 😱
      const method = {
        imgScale: () => {},

        onScroll: () => {
          scrollTop = scrollY;
          xrayScrollY = scrollTop - info.objs.section_xray.offsetTop;
          xrayRatio = Math.min(1, (xrayScrollY / (info.objs.section_xray.offsetHeight - innerHeight)));
          method.imgScale(xrayScrollY)
        }
      };
우선 스크롤 이벤트니까 수치들 구해줘야겠찌?
scrollY랑 ratio 구해놓고 imgScale에 scrollY값 넘겨준당
      const method = {
        imgScale: (_scroll) => {
          info.objs.xray_imgs[0].style.opacity = `${calc(_scroll, info.values.xray_img01_opaicty, info.objs.section_xray, true)}`
          info.objs.xray_imgs[0].style.transform = `translate(-50%, -50%) scale(${calc(_scroll, info.values.xray_img01_scale, info.objs.section_xray, true)})`
          if(xrayRatio < info.values.xray_text01_opacity_in[2].end){
            info.objs.xray_texts[0].style.opacity = `${calc(_scroll, info.values.xray_text01_opacity_in, info.objs.section_xray, true)}`
          }else{
            info.objs.xray_texts[0].style.opacity = `${calc(_scroll, info.values.xray_text01_opacity_out, info.objs.section_xray, true)}`
          }


          info.objs.xray_imgs[1].style.transform = `translate(-50%, -50%) scale(${calc(_scroll, info.values.xray_img02_scale, info.objs.section_xray, true)})`
          if(xrayRatio < info.values.xray_img02_opaicty[2].end){
            info.objs.xray_imgs[1].style.opacity = `${calc(_scroll, info.values.xray_img02_opaicty, info.objs.section_xray, true)}`
          }else{
            info.objs.xray_imgs[1].style.opacity = `${calc(_scroll, info.values.xray_img02_opaicty_out, info.objs.section_xray, true)}`
          }
          if(xrayRatio < info.values.xray_text02_opacity_in[2].end){
            info.objs.xray_texts[1].style.opacity = `${calc(_scroll, info.values.xray_text02_opacity_in, info.objs.section_xray, true)}`
          }else{
            info.objs.xray_texts[1].style.opacity = `${calc(_scroll, info.values.xray_text02_opacity_out, info.objs.section_xray, true)}`
          }


          info.objs.xray_imgs[2].style.opacity = `${calc(_scroll, info.values.xray_img03_opaicty, info.objs.section_xray, true)}`
          info.objs.xray_imgs[2].style.transform = `translate(-50%, -50%) scale(${calc(_scroll, info.values.xray_img03_scale, info.objs.section_xray, true)})`
          if(xrayRatio < info.values.xray_text03_opacity_in[2].end){
            info.objs.xray_texts[2].style.opacity = `${calc(_scroll, info.values.xray_text03_opacity_in, info.objs.section_xray, true)}`
          }else{
            info.objs.xray_texts[2].style.opacity = `${calc(_scroll, info.values.xray_text03_opacity_out, info.objs.section_xray, true)}`
          }


          if(xrayRatio >= 0.4){
            info.objs.xray_video.classList.add('show')
          }else{
            info.objs.xray_video.classList.remove('show')
          }
        },

        onScroll: () => {
          scrollTop = scrollY;
          xrayScrollY = scrollTop - info.objs.section_xray.offsetTop;
          xrayRatio = Math.min(1, (xrayScrollY / (info.objs.section_xray.offsetHeight - innerHeight)));
          method.imgScale(xrayScrollY)
        }
      };
onScroll에서 받은 scrollY 값으로 스타일을 넣어준다~ ~~
동시에 같은 속성 스타일 주고 싶으면 if else
모 스타일 넣어주는 부분은 그냥 노가다로 적으면 돼서 별 거 없당
info.values에 수치랑 타이밍 넣어뒀으니까 ㅎㅎ
근데!! 이번에는 calc()에 true, false도 넘겨주는데 왜냐하면
    let partStart, partEnd, partScroll, partRatio, styleValue;

    const calc = (_scroll, values, el, status) => {
      if(status){
        partStart = (el.offsetHeight - innerHeight) * values[2].start;
        partEnd = (el.offsetHeight - innerHeight) * values[2].end;
      }else{
        partStart = el.offsetHeight * values[2].start;
        partEnd = el.offsetHeight * values[2].end;
      }

      partScroll = Math.max(0, (_scroll - partStart));
      partRatio = Math.min(1, (partScroll / (partEnd - partStart)));


      if(_scroll < partStart){
        styleValue = values[0]
      }else if(_scroll > partEnd){
        styleValue = values[1]
      }else{
        styleValue = partRatio * (values[1] - values[0]) + values[0]
      }

      return styleValue;
    };
ratio 구할 때 innerHeight를 뺐는지 안 뺐는지 구분하기 위함!
전엔 calc01() calc02() 이렇게 두 개를 만들었었는데
비효율적이자나? 그래서 status로 관리해주기루 해따

완성작 ㅎ ㅎ
이 정도면 비슷하지 않나? ^ㅇ^
전엔 스크롤 인터랙션이 막연하게 어려울거라 생각했는데
섹션별 scrollY값이랑 ratio만 구하면 그 다음 부턴 수치 싸움인 것 같당
0과 1 사이의 중요성을 알게되어따
또또 많은 부분이 생략이 되고
냅다 코드만 적어놨지만.. 적었단 것에 의미를 두자 👊
이번에 정말 감사하게도
시영CD님🙊, 가현님, 린다, 귤님과 함께
한화 온라인 기념관 Three.js 프로젝트를 맡게 되어따!!!!
정말 설레고 다들 정말 멋진 분들이라 나도 꼭 도움이 되구싶당
기운 내고.. 열심히 살자 현정아 ...
요즘 나를 되돌아 보는 시간을 가지면서 많이 느낀 게
평소의 내 감정 그래프가 높은 상태다 보니
한 번 떨어지면 그 만큼 떨어지는 폭이 커서
내가 견디기 힘들어하는 것 같당
그래서 일정한 감정 상태 유지하는 연습을 해볼라고 ㅎ ㅎ
연휴가 이렇게 반갑지 않은 건 처음이야
출근하고싶다 구냥 ㅜ ㅋㅋ ㅜ 바쁘게 살래
당장은 하루하루... 어떻게 버틸지...... 막막하고.... 힘들겠지만........
그래도 어떡햐 나는 이 험난한 세상 속의 회사원^ㅇ^
헬스장 가서 멍때리고 땀빼고.,, 일에 치여서 살다 보면.,....,..
시간은 ^^ ~ ~~ 흐르겄지 ~~ 휴 ~ ~ ~~
이건 ,.,, 마음의 근육통이다.. 견뎌 ..,,
힝 😭😭😭😭😭
'🦄' 카테고리의 다른 글
카메라 가지고 놀기 1탄 (6) 2022.10.04 🔗 (0) 2022.09.22 지금의 나 (2) 2022.09.19 댓글
dallae_log
안녕 난 달래야🐣
